The first brake job I did in my driveway was in 2009 on a 2002 Honda Civic. I had never done it before, I watched three YouTube videos the night before, and the whole thing took me about three hours including a trip to AutoZone for a tool I did not know I needed. Total parts cost was $45. The shop had quoted me $320. I learned a lot that day and I have done probably 50 brake jobs since, on every car I have owned and on friends' cars. The savings add up, but more importantly the brake job is one of the most rewarding DIY projects for a beginning home mechanic because you can feel the difference when you drive the car afterward.
In 2026 a shop brake job on a compact sedan runs $350 to $500 for both front pads including rotors if they need replacement. On a European car or a performance car, the cost is $500 to $900 per axle. The DIY cost is $80 to $200 per axle depending on brand of pads and whether you need rotors. The savings per brake job are $270 to $500, and most cars need brake work every 50,000 to 70,000 miles, so we are talking about $1,500 to $3,000 saved over the life of a 250,000-mile car.
What You Actually Need Before Starting
A floor jack and two jack stands are non-negotiable. Working under a car supported only by a jack is how people get killed. A pair of 3-ton rated jack stands costs $70 and is a one-time purchase that will last your entire mechanical career. A decent floor jack is $120 to $180.
A socket set with metric sizes from 10mm to 19mm and extensions is essential. Most brake calipers use 14mm, 15mm, or 17mm bolts. A 1/2-inch drive breaker bar helps with caliper bracket bolts that are often installed with red thread locker and require significant torque to break loose.
A C-clamp or a brake caliper piston compression tool is required to push the old pads out of the way so the new thicker pads can fit. A 6-inch C-clamp from Harbor Freight works for most cars and costs $15. For cars with electric parking brakes on the rear axle, you may need a specialized tool that costs $30 to $80, or a scan tool that can put the parking brake into service mode.
Brake cleaner spray, disposable nitrile gloves, and a small wire brush complete the kit. A torque wrench is highly recommended for tightening the caliper bracket bolts and the wheel lugs to manufacturer specification. A mid-range 1/2-inch drive torque wrench covers the range you need.
For parts, you need brake pads and possibly rotors. For most cars, I use Akebono ceramic pads (clean, quiet, moderate wear) or Hawk HPS for enthusiast cars (more bite, dustier). Rotors depend on the car, with EBC, Bosch, or OEM-spec blanks for most street use, and slotted aftermarket rotors for track-use cars.
The Actual Process, Step by Step
Park the car on a level surface, set the parking brake, and place wheel chocks behind the rear wheels if working on the front axle, or in front of the front wheels if working on the rear axle. Loosen the lug nuts on the wheel you are going to remove while the car is still on the ground, just enough to break them loose. Trying to loosen lug nuts on a wheel that is lifted off the ground is difficult because the wheel spins.
Jack the car up at the manufacturer's recommended jack point, typically a reinforced pinch weld behind the front wheel or in front of the rear wheel. Raise the car high enough to clear the wheel, then lower it onto jack stands. Do not work on a car that is supported only by a jack.
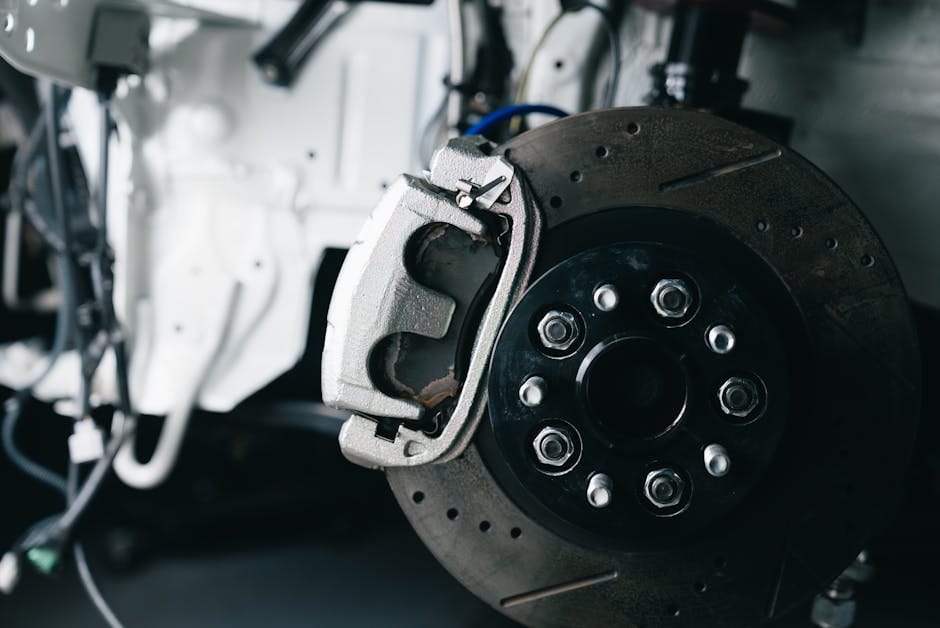
Remove the wheel and set it aside. Now you have access to the brake caliper, which is the clamp that holds the pads against the rotor. On most cars the caliper is held in place by two bolts on the back side. Remove these bolts with a socket. If the bolts are stuck, a breaker bar with an extension gives you more leverage.
With the caliper bolts removed, the caliper comes off the rotor and can be hung from the coil spring using a bungee cord or a specialized caliper hanger tool. Never let the caliper hang from the brake hose, as this damages the hose and can cause brake failure.
The pads slide out of the caliper bracket. Note the orientation of the clips and the wear indicator, which is a small metal tab on one pad that scrapes against the rotor when the pads are near the end of their life.
Now you need to compress the caliper piston so the new, thicker pads will fit. Put an old pad against the piston and use your C-clamp to slowly press the piston back into the caliper. The piston moves as you tighten the C-clamp. Do this slowly and make sure the piston goes in straight. On some cars you need to open the brake fluid reservoir cap to allow fluid to back-flow, otherwise the caliper will not compress.
Install the new pads in the caliper bracket, paying attention to the orientation of the wear indicator and any shims or anti-rattle clips that came with the pads. Some pads come with a small packet of brake lubricant, which you apply to the back of the pads where they contact the piston and the caliper bracket. Never get lubricant on the friction surface of the pad.
Reinstall the caliper over the new pads, threading the bolts back in by hand before torquing them to specification with the torque wrench. Caliper bracket bolts are typically 70 to 90 ft-lb, though your specific car may vary. Put the wheel back on, tighten the lug nuts by hand, lower the car, and torque the lugs to the proper specification.
When to Replace Rotors
Rotors are the metal discs that the brake pads squeeze against. They wear down over time and develop a lip around the outer edge where the pad does not reach. Measuring rotor thickness with a micrometer against the minimum thickness stamped on the rotor itself tells you whether the rotor needs replacement. If the rotor is below minimum, it must be replaced.
Most cars need rotors replaced every second or third brake pad change, depending on driving style and pad compound. Aggressive pads wear rotors faster. Performance driving wears rotors faster. Frequent stop-and-go traffic also wears rotors faster than highway driving.
When you replace rotors, the old rotor simply slides off after the caliper and bracket are removed. Sometimes rust holds the rotor to the hub and a few taps with a hammer on the rotor (not on the hub) are required. Clean the hub with a wire brush before installing the new rotor, and apply a thin coat of anti-seize compound to the hub face to prevent future rust sticking.
Break-In Procedure for New Pads
Most new pads require a break-in procedure to properly transfer material from the pad to the rotor. The specific procedure varies by pad manufacturer, but a typical break-in involves 6 to 10 moderate stops from 45 mph to 15 mph with a short cool-down between each stop, followed by 2 or 3 hard stops from 55 mph to 10 mph, then a long cool-down before regular driving.
Skipping the break-in procedure can cause brake judder, premature pad or rotor wear, and reduced stopping distance. The procedure takes 10 minutes and is worth the effort. Find an empty parking lot or a quiet road and do it deliberately.
When You Should Pay a Shop Instead
Certain cars have brake systems that are genuinely difficult for DIY work. BMW, Mercedes, and Audi with electronic parking brakes require either a specialized scan tool or a deep understanding of the system to avoid damaging components. If you do not have a scan tool and you cannot reset the parking brake through a diagnostic procedure, pay the dealer for rear brakes on these cars.
Cars with carbon-ceramic brakes should never be DIY serviced. The pad and rotor materials are specialized, the installation is sensitive to contamination, and the parts are expensive enough that a mistake is very costly.
If your caliper pistons are seized and will not compress with normal C-clamp pressure, the caliper needs to be rebuilt or replaced. A seized caliper is a safety issue that requires more skill to diagnose and fix than a basic pad swap. If you are not confident in your ability to identify a seized caliper, or to rebuild or replace one, pay a shop.
The Final Word
Brake pads on a modern car, for most mainstream vehicles, are the easiest significant maintenance job you can do. Start with your first one and do not rush it. Watch YouTube videos specific to your make and model, because every car has small variations in how the caliper is held to the bracket or how the sliders are greased. Once you have done it once, the second and subsequent jobs are routine.
The savings are real, the skill is learnable, and the safety of the job is straightforward if you use proper jack stands and take your time. This is the DIY project I recommend to any beginner home mechanic because the feedback loop is fast (you can feel the difference on the drive home), the parts are affordable, and the confidence you build from doing it well transfers to other projects. If you want to start doing your own car work, start with brakes. You will be glad you did.